
You are currently browsing redforkhippie’s articles.

Here at the House of the Lifted Lorax, we don’t celebrate Valentine’s Day with flowers and candy. We celebrate it with potting soil and seed packets.
Feb. 14 falls two months and a day ahead of the last frost date for our zone, which makes it an ideal time to start seeds indoors. We buy our seeds from Seed Savers Exchange, which is a great organization dedicated to preserving heirloom varieties of tomatoes, peppers, cucumbers, herbs, flowers and more.
Tomatoes are our favorite crop. You can buy a decent cucumber at the grocery store, and you can find passable squash, peppers, and eggplant at the farmer’s market, but nothing can stand in for a homegrown tomato, fresh from the vine … so regardless of what else we may or may not put in the garden, we always grow tomatoes.
Most years, I get a little carried away, trying new varieties, but this year, I exercised some restraint and confined myself to four varieties: two kinds of cherry tomatoes (Risentraube and Mexico Midget); Silvery Fir Tree (an early slicer with pretty foliage); and my all-time favorite, Black from Tula, which is a Russian heirloom that produces unspeakably ugly but indescribably delicious fruit.
I haven’t grown the first three varieties in the past, but I’ve yet to see a cherry tomato that wouldn’t thrive in all conditions, and Silvery Fir Tree just looked too beautiful to pass up, so we’ll see how they do.
There are two secrets to great tomatoes:
1. Horse manure. Find a nice person with horses and ask if you can scoop stalls in exchange for manure. A mix of manure, urine-soaked sawdust, and spoiled hay is the world’s finest compost starter, as the nitrogen-to-carbon ratio is as close to ideal as you can get without a chemistry lab. I’ve grown tomatoes the size of softballs, on vines that looked like kudzu, with the help of horse compost.
2. Deep holes. Use a posthole digger to dig down two to three feet. Most tomatoes’ roots will grow down until they hit hardpan, and then they start to spread out sideways. In hot, dry weather, the top layer of soil dries out very quickly, and the roots dry with it. If you dig a posthole to a depth of about one foot below hardpan, your tomatoes’ roots will be able to reach the moist dirt that lies below instead of spreading out to bake in the sun.
I’ll have more on the tomatoes as they progress, but at the moment, the seeds are tucked quietly into moistened potting medium in a seed-starting flat. As soon as I finish converting our potting table to a temporary cold frame, I’ll move them outdoors.
Emily
I know it’s a little early to be thinking about lawn care, but spring will be here before we know it, and some of us will be in the market for new lawnmowers.
One terrific — and easy — way to reduce your environmental impact and save a lot of money is to use an old-fashioned reel mower instead of a gas-powered mower.
Contrary to popular belief, a properly maintained reel mower is a delight to use. Lightweight, quiet, and efficient, they use no gas, require no effort to start, can be used without remorse on ozone alert days, and are much safer than gas-powered mowers, as the blades work in only one direction, making it virtually impossible to cut yourself while mowing.
A decent reel mower can be had for less than $100 at most hardware stores. (If the big boxes don’t carry them, try your local mom-and-pop.) Try to find one with a U-shaped handle, rather than a T or Y-shaped handle, as they tend to hold up better.
The biggest complaint I hear about reel mowers is that they are hard to push. This is true of dull mowers, but it’s a non-issue if you keep the blades sharp. If the mower starts getting a little balky, simply use a kit (available online for $25 to $30) to sharpen the blades.
You’ll also want to be aware that reel mowers are not good at handling very tall grass, so don’t neglect the lawn for three weeks and then expect your reel mower to do the work of a sling blade.
If you want to save clippings to use in your compost pile, many models come with grass catchers, which can also be purchased separately for around $30 apiece.
It’s been our experience that you can get about three seasons out of a reel mower before the gears start to wear out, although this obviously will depend on the size of your yard and how often you mow it.
I’m not sure I’d want to use a reel mower on a large property, but for a typical suburban backyard, I consider it an ideal tool.
Here is a quick, free way to eliminate tiny drafts around the house. I learned it from my mom when I was about 4, and I’ve never forgotten it:
1. Save the polystyrene trays that are used to package meat, mushrooms, and other foods. (Polystyrene egg carton lids will work for this purpose.)
2. Take the plastic cover off an electrical outlet.
3. Use the cover as a pattern to make a polystyrene cutout the same shape and size as the cover.
4. Put the cover back on the outlet, wedging the polystyrene cutout between the cover and the wall.
Do this on all your outlets — especially those on exterior walls — to help reduce heat loss.
This seems insignificant, but it really helps, it doesn’t cost anything, and it’s an easy way to recycle polystyrene that otherwise would end up in a landfill.
If you have a lot of styrofoam trays, you could even make some of these for your friends.
I took temperature readings inside and outside our passive-solar henhouse on New Year’s Day. At 2:30 in the afternoon, the outdoor air temperature was in the high 40s, the temperature in the sunshine on the ground in front of the henhouse was 61, and the temperature inside the henhouse was 72.
Getting the hens out of the chicken tractor and into the new structure was something of a trick. We were using pavers to hold the door shut, and our barred Rock, Solitaire, proved much stronger and much more willing to squeeze through a small space than we’d expected. We’d put Solitaire into the henhouse, carefully secure the door, and as soon as we turned our backs, she’d come sauntering back out the side. It was pretty funny. We finally gave up on the pavers and used a couple of big logs from the woodpile to hold the door shut, which worked a lot better.
Once the girls were back together, they calmed down and quit trying to sneak out. The quarters were a little tight, and I don’t think they liked being walled in like that — after all, they’re used to being outdoors — but their temporary home did a good job of protecting them from the elements when temperatures dropped into the teens for a couple of nights, and I slept better knowing my girls were safe and warm, even if they weren’t very happy with me.
Emily
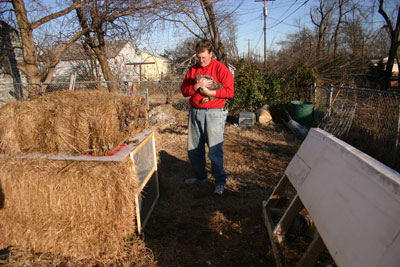
As I think we’ve mentioned before, we keep a half-dozen backyard hens here at the House of the Lifted Lorax. We usually keep them in their chicken tractor — a kind of portable henhouse — to give them access to fresh forage while protecting them from the neighborhood cats. (You can see our chicken tractor to the right in the photo above.)
During extreme cold, the hens need a little more protection than the tractor offers, so with forecasts calling for temperatures in the teens on Tuesday night, we spent this afternoon finishing up a project I started a couple of months ago: a passive-solar, biodegradable henhouse.
We started by arranging six hay bales to form three thick walls:
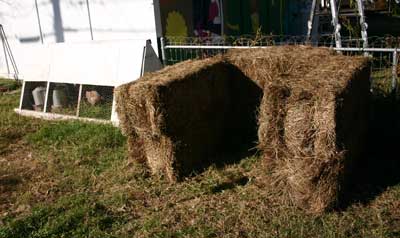
(You can see another view of the chicken tractor to the left in the picture above.)
Next, Ron cut a piece of half-inch plywood to fit over the top. I think the dimensions were something like four feet by five feet.

I used some leftover spray paint from other projects to seal the plywood, which hopefully will help keep it from delaminating in wet weather.
Using L-brackets and T-brackets, I screwed some 1x2s together to form a simple frame that’s reinforced in the center. I attached two hinges at the top and stapled some half-inch hardware cloth to the back side of the frame to make a screen door. (You could probably use chicken wire, but we thought the hardware cloth would be a little sturdier.)
I screwed the hinges to the plywood, we put two more hay bales on top, and — voila! — a little house:

I will run out to the hardware store later and pick up a roll of clear Frost-King plastic and a couple of cinder blocks. I’ll use about a yard of plastic to cover the door, stapling it to the plywood to make a flap we can raise and lower as necessary to regulate the temperature inside the henhouse. The cinder blocks will be used to secure the door, as there’s not much way to attach hardware to hay bales to make a latch.
I’m guessing our girls are probably the only hens in Tulsa County who will be spending the coldest nights of the year in a passive-solar house with an R-value somewhere in the neighborhood of 45. 🙂
I’ll pick up a couple of thermometers at the hardware store this afternoon and take some readings inside and outside the henhouse to get an idea of how it will perform. Stay tuned….
Emily
Big ice storms that knock down branches and destroy power lines are really terrible … unless, y’know, you happen to own a woodstove, a chainsaw, and a pickup truck:


We’ll have to rent a splitter to bust up some of the really huge pieces, but we’re not crying about it. Four ricks of free firewood, all laid in for next year, and all Ron had to do was spend a couple of afternoons driving around the neighborhood, gathering it off the curbs. It’s all too green to burn right now, but by next winter, it will be seasoned and ready to go.
If you have access to a truck and a saw, you can be a big help to your neighbors (and every taxpayer in your community) by removing branches from curbs in exchange for the firewood after a storm. Most people don’t have a fireplace or woodstove … so if you do, they’ll be happy for you to come and haul away their storm debris in exchange for the wood.
Emily
There’s really no excuse for anybody to clutter up the landfills with perfectly good organic material. I started my first compost bin about eight years ago in a plastic tub under my kitchen sink in a small, second-story apartment, and I’ve been composting ever since.
Most people use one of two basic composting techniques: Thermophilic composting or vermicomposting.
Thermophilic composting works best when you have a backyard with a space roughly one meter deep and two meters wide. Start the pile with roughly equal parts “greens” (nitrogen-based materials such as fresh grass clippings, manure, or vegetable scraps) and “browns” (carbon-based materials such as dry leaves, dry grass clippings, or straw). Layer the materials so that you have a pile roughly one meter high, one meter deep, and one meter wide, with greens on the bottom and browns on the top, leaving a one-square-meter space next to the pile. Use a garden hose to moisten the pile to roughly the consistency of a wrung-out washcloth.
At this point, you can just leave the pile alone, and over time, it will break down. But a hot pile is faster and more fun to watch. To heat it up, simply aerate it by using a pitchfork to turn the pile, one forkful at a time, into the empty space next to it, adding water as necessary to maintain the appropriate moisture level.
If your brown-to-green ratio and your moisture level are correct, in a few days, you will start to notice that the middle of the pile is giving off heat — and if the weather is cool, you may even see a little steam.
The heat is produced by thermophilic, or heat-loving, bacteria that grow inside a well-balanced, properly aerated pile.
If you’re in an apartment or house without yard space, you can still make compost. You just need to get some worms to help.
To build a vermicomposting (worm) bin, take a good-sized plastic tub with a tight-fitting lid (10-gallon Rubbermaid tubs are great for this) and drill holes in the sides and bottom for aeration and drainage. Place a quart or so of kitchen scraps in the bottom of the tub. Add a small handful of potting soil for grit (this aids the worms’ digestion) and a layer of moistened peat moss, wood shavings, or shredded newspaper for bedding.
NOTE: I have not had good luck with cedar shavings in worm bins. They’re too aromatic for the worms. Aspen is a better choice.
Dump in a half-pound or so of red wiggler worms (it is VERY important that you stick to this species, as it is one of the few that can not only survive but thrive in a worm bin), put the lid on the bin, and place a tray under it to collect any excess moisture that drains out of it. It’s a good idea to elevate it slightly so it can drain properly into the tray.
Whenever you have vegetable scraps from the kitchen, add them to the bin, cover them with a layer of shavings or shredded newspaper, and spray thoroughly with the water bottle as necessary to keep the bin damp.
To harvest finished compost, simply move all the compost to one side of the bin and place a handful of vegetable scraps and fresh bedding in the other side. The worms will naturally migrate to the food, at which point you can take out the finished compost and use it to grow herbs and flowers on your patio.
Never place meat, dairy, or grains in your compost pile or bin; they tend to create problems with odors, vermin, or both. Also, manure is great in a compost pile, but DO NOT use dog or cat waste, as they yield potentially pathogenic compost that is considered unsafe to use on food crops.
If the pile or bin smells nasty, try reducing the moisture level and/or increasing the amount of “brown” materials, as odors are usually the result of excess moisture or nitrogen.
City Farmer has great advice on composting; click here for detailed instructions on vermicomposting or here for instructions on building a backyard bin.
In the interest of making this blog a little more useful to readers, I’m adding a “tip of the week” feature to help those who are interested in moving toward increased energy and a more environmentally friendly lifestyle. Most of these tips will be small, simple, inexpensive projects you can do to reduce your impact on the environment.
This week’s tip is about reducing phantom loads.
Wikipedia defines a phantom load as “the power consumed by any device when it is switched off.”
Some electrical appliances and gadgets use power even when they’re supposedly shut off. Televisions, for instance, constantly draw a small amount of power. Built-in digital clocks, such as those found on microwaves and VCRs, draw power. Anything with speakers is a potential phantom load. Anything with an LED that stays lit all the time is a phantom load.
You can reduce phantom loads in one of three ways:
1. Unplug these appliances when they are not in use.
2. Connect outlets to a wall switch and shut off the switch when the appliances plugged into the outlet are not in use.
3. Plug appliances into a power strip (such as the surge protectors used for computers and other electronic equipment) and switch off the power strip when the appliances are not in use.
Individually, phantom loads don’t seem like a big deal. But together, they add up … and it’s galling to think about paying for electricity to power something that you aren’t even using.
Do the environment a favor: Pick up a power strip next time you’re at an electronics store and use it to eliminate a phantom load or two around the house. It’s an easy, inexpensive way to make your environmental footprint just a little smaller.
Emily

With a woodstove in the middle of the living room, we have a ready supply of very warm, very dry air to dry our clothes. Sometimes that air is a little too dry, which is one reason I keep a teakettle of water on top of the stove at all times.
I decided to kill two birds with one stone this evening by putting up this handy-dandy winter clothes dryer, which hangs next to the woodstove, saves us money on gas and electricity, and effectively turns our wet garments into makeshift humidifiers.
All I did was screw some hooks into the wall just above our bay window and hang large-link decorative chain from the hooks. I just put all the laundry on plastic coathangers (no metal — they’ll rust and ruin your clothes) and hang it from the chains, which will easily accommodate an entire load of laundry. When the clothes are dry, I just put the clothes in the closet and stash the chains in the laundry room.
As you can see in the picture, the hooks are also performing a decorative function at the moment, holding up a string of energy-efficient LED Christmas lights, which I got for about $8 at Home Depot.
For those of you who may have missed the solar tour on Saturday, I put together a sort of virtual tour of our home, indoors and out, to give you an idea of some of the things we’re doing to reduce our environmental footprint. You can view the slideshow here.
Emily

Recent Comments